Inserting an image into a post

Collapse
This is a sticky topic.
X
X
 
  • Filter
  • Time
  • Show
Clear All
new posts
  • ZagNative
    Zag for Life
    • Feb 2007
    • 17082

    Inserting an image into a post

    Part #1 - Inserting an image from the internet into the body of a post on GUBoard


    I use Mozilla Firefox, so that's what the graphics below will generally show. What you'll see in IE Explorer or other browsers will likely be different, so you'll just have to understand the concept and figure out the differences.

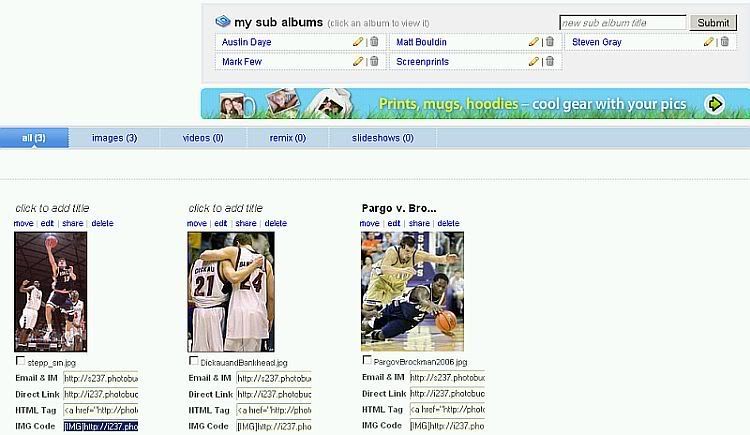
    Step 1 - With your mouse above the image you want to post, right click and select "Copy Image Location." (In IE Explorer, select "properties" instead and then copy the image location, being careful to select the entire location, which almost always will end with ".jpg.")


    If you're using IE explorer and so are getting the address from the "Properties box, select the whole link and press control+c to copy it:
    Note: Observe that the image location is not necessarily the same as what you will see in the browser address bar. If you use what's in the browser bar, your image might show up as a link in your post, not as an image.

    Step 2 - On the GUBoard, inside the post screen, click on the image icon (the little envelope third from the right above the posting window):


    Paste the image location URL there (Control+V) and hit the okay button.

    Note: After you have inserted the image in your post, hit the "Preview Post" buttom to make sure your image appears as expected, then hit the submit button, and you should be good to go.

    ***The stuff above may appear elsewhere in support, but I couldn't find it when I went looking for it, and it seemed as though enough of us have trouble posting images to warrant spending a few minutes on some graphic instructions.

    Feel free to add thoughts here, folks, if you have better ideas or if you have questions.

    Next: How to post an image from your hard drive into a post. (I might not get to that tonight, though, as I need to watch Theo's game for the bronze in Bangkok.)
    Last edited by ZagNative; 08-17-2007, 08:05 PM.
    _______________________________
    Gonzaga - The Greatest Student Section in the Nation!
  • ZagNative
    Zag for Life
    • Feb 2007
    • 17082

    #2
    Uploading Photos from Your Computer to PhotoBucket and linking from a GUBoard post


    Caution: I'm still basically a novice when it comes to Photobucket, but maybe this will provide some help for Zags fans who have great photos on their hard drive they'd like to share with other Zags.

    I've used ImageShack.com until ust recently, but have switched to PhotoBucket. Photobucket just seems ten times more intuitive, and it's easy to organize photos so you can find them again.

    Step 1: Join Photobucket, if you haven't already done so. It's free.

    www.photobucket.com


    Select "Join Now" and register.


    Step 2:
    Log in to Photoshack (you may need to wait for an e-mail from photoshack and double-click on the link provided in the e-mail to activate your account first.)
    Click "Browse," find the photo you want to upload from your hard drive and double-click to add it. Repeat manually for each photo you want to upload (or use the beta multiple-image upload on the screen if you prefer).


    Click the Upload button.

    Note: I like eto organize my photos into subalbums to make stuff easier to find, as shown above with a directory for each of several players, etc., as shown above under the "Upload" button. You can upload from within an album so the uploaded photos go directly there, or else upload to your main album and then move to the desired directory by clicking the "Move" option above each image. However, be sure you don't move an image after you've already linked to it on the GUBoard, or the link will be broken and your image won't display in the post on the GUBoard.

    Step 3: Scroll down the screen to see your images that have been uploaded, and click in the "IMG Code" box, which will copy the html code to paste into the GUBoard window.


    Step 4: Go to your post on GUBoard and press Control+V to paste the Image code. Hit the preview buttom to make sure all is well, finish your post, and hit the submit button.

    Note: There is a resize option button to shrink the size of your images to a reasonable size for posting on the board, usually something like 640 x 480 or proportionately less. I haven't used it yet because I always resize my photos to the size I want before uploading them.

    Anyway, hope that helps.
    Last edited by ZagNative; 08-18-2007, 11:04 PM.
    _______________________________
    Gonzaga - The Greatest Student Section in the Nation!

    Comment

    • Zagguy23
      Bulldog Fan
      • Aug 2007
      • 40

      #3
      you have computer skills far beyond my own

      Comment

      • ZagNative
        Zag for Life
        • Feb 2007
        • 17082

        #4
        I mentioned above, that the file name for an image suitable for linking to the GUBoard will usually end with ".JPG." Other permissible extensions, I believe, are
        GIF, JPEG, TIFF, PNG, PPM, and WBMP.

        Emoticons typically have GIF extensions. This is an example of a GIF image:


        i.e., http://media.scout.com/media/image/31/311043.gif
        _______________________________
        Gonzaga - The Greatest Student Section in the Nation!

        Comment

        • ZagNative
          Zag for Life
          • Feb 2007
          • 17082

          #5
          Creating or Linking an Avatar

          This is a helpful thread about Avatars.
          _______________________________
          Gonzaga - The Greatest Student Section in the Nation!

          Comment

          • ZagNative
            Zag for Life
            • Feb 2007
            • 17082

            #6
            Attaching images to a post from my hard drive

            I have never been able to attach an image directly from my hard drive so it appears in a post as a photo and not a link. This is a test to see what I'm doing wrong.


            Hah! A light comes on. See the next post for steps to insert a photo from your hard drive into a post without having to upload it to a photo-hosting website.
            Last edited by ZagNative; 08-21-2007, 12:40 AM.
            _______________________________
            Gonzaga - The Greatest Student Section in the Nation!

            Comment

            • ZagNative
              Zag for Life
              • Feb 2007
              • 17082

              #7
              Aha! Attachment Mystery Solved!

              I can't believe how easy this was. What a numbskull I was not to have figured it out earlier!

              Step 1 - Hit the paper clip above the posting window.

              Step 2 - To upload the file from your computer, hit the "Browse" button and then double-click the file on your hard drive you want to attach, and then select the "upload" button next to the browse button. Repeat for each file you want to attach. The files that have been attached will show in the window as "Current Attachments". Close the "Manage Attachments" window.

              Step 3 - Now you're back in the posting window, where you will hit the paper clip button again, to insert your attachment in the post. Select the attachment you want to insert at a particular spot.


              Preview the post, and you should be good to go.
              _______________________________
              Gonzaga - The Greatest Student Section in the Nation!

              Comment

              • ZagNative
                Zag for Life
                • Feb 2007
                • 17082

                #8
                Zagnative is back to square one. Attachments I previously made to this post no longer appear. I'm glad I figured out how to upload to a website like photobucket or image shack, because attachments are inconsistent for me!

                I'm going to test here and see if I can attach now.

                74m.jpg

                Nope. Not working.

                Edited to add: I deleted some old attachments and now the attachments in this thread are working! There may be a limit to the amount of storage the system allots for each user. No clue. No clue at all.
                Last edited by ZagNative; 10-09-2007, 02:00 PM.
                _______________________________
                Gonzaga - The Greatest Student Section in the Nation!

                Comment

                • Rubbadub
                  Zag for Life
                  • Feb 2007
                  • 10242

                  #9
                  you and your pictures
                  sigpic Just Foo'in around.

                  Comment

                  • ZagNative
                    Zag for Life
                    • Feb 2007
                    • 17082

                    #10
                    Why, I believe I'll take that as a compliment!

                    _______________________________
                    Gonzaga - The Greatest Student Section in the Nation!

                    Comment

                    • ZagNative
                      Zag for Life
                      • Feb 2007
                      • 17082

                      #11
                      Resizing and Editing Photos

                      If you want to resize your photos so they display better on the GUBoard, you can download Irfanview, which is a really nifty free (shareware) program. There are also online services you can use on the web, but I like Irfanview.

                      Irfanview also makes it easy to do screen copies and save them as graphical images you can upload to Photobucket or Imageshack and link in posts, as I did with the graphical images in the posts above. It will also let you crop images to capture only the stuff you want (as done in the images in the instructions above.)

                      To resize a photo in Irfanview, select "Image" from the menubar, and select the resize option. On the GUBoard, optimum width is 700 pixels or less. Enter the width you want and the height adjusts automatically.


                      Save the edited photo (as a copy of the original if you don't want to overwrite it) and upload as usual.

                      I'm sure there are smarter ways to do the stuff outlined here, but this might get you started.
                      _______________________________
                      Gonzaga - The Greatest Student Section in the Nation!

                      Comment

                      • lothar98zag
                        PostPadder General
                        • Feb 2007
                        • 12370

                        #12
                        bump
                        .
                        youtube - "The Runner"


                        Foo Fantasy Football Champ 2013

                        Dumbing down the internet, one post at a time

                        Foo Fantasy Football Champ 2011

                        Comment

                        • DenDiegoZag
                          Kennel Club
                          • Feb 2007
                          • 311

                          #13
                          Wish I would have read this BEFORE I went diving into the Foo this afternoon...

                          HA

                          Bump...
                          Rolling down the street...with my mind on my Foo and my Foo on my mind...

                          Comment

                          • Akzag
                            Zag for Life
                            • Feb 2007
                            • 13397

                            #14
                            Ak-Bump
                            So many brackets, so little time.

                            Comment


                            • #15
                              Originally posted by ZagNative View Post
                              Uploading Photos from Your Computer to PhotoBucket and linking from a GUBoard post


                              Step 4: Go to your post on GUBoard and press Control+V to paste the Image code. Hit the preview buttom to make sure all is well, finish your post, and hit the submit button.

                              Note: There is a resize option button to shrink the size of your images to a reasonable size for posting on the board, usually something like 640 x 480 or proportionately less. I haven't used it yet because I always resize my photos to the size I want before uploading them.

                              Anyway, hope that helps.
                              ZagNative--I got as far as step 4, but when I do that, only the code shows up in the preview, not the picture.

                              ID ZAGFAN

                              Comment

                              Working...
                              X